HOLY FREE ART PROGRAMS BATMAN
HOLY FREE ART PROGRAMS BATMAN
I’ve had this list sitting around for a while (in case I ever want to try something new) and I thought I’d share it, because why the hell not, everybody loves free stuff. I’ve only used a couple, so for all I know these could be complete shit. BUT YOU NEVER KNOW, RIGHT?
*= available for both windows and mac os
GIMP * - Does a lot of the same stuff as Photoshop.
FireAlpaca * - Similar to Paint Tool Sai, so it’s a good alternative for Mac users.
Autodesk Sketchbook Copic Edition * - Simulates the look of copic markers.
MyPaint * - Basic stuff, nothing fancy.
Pinta * - Drawing program modeled after paint.NET.
Inkscape * - Vector/drawing program meant to be similar to Illustrator.
ArtRage * - Digital painting program; you can get the trimmed down version for free or buy the full version with more features.
Sumo Paint * - In-browser drawing app.
DAZ Studio * - Some sort of 3D model poser thing.
Pencil * - Software for animating.
SketchUp * - Tool for making 3D models. Looks handy for stuff like architectural drawings.
Blender * - Pretty popular 3D software.
escape motions * - Some browser apps, fun to fiddle with when you’re bored (the fluid fire simulation is pretty cool imo).
Twistedbrush (Pixarra) - Seems to be meant for replicating the look of traditional media.
Pixia/Phierha - A popular program in Japan, according to the website.
Krita - This was originally made for Linux and it looks like the developers haven’t ironed out all of the kinks in the Windows installer.
Artweaver - Another trimmed down free thing if you don’t want to buy the full program.
paint.NET - Pretty basic kit, probably good for simple stuff.
Project Dogwaffle - I’m not sure what this one is all about because I couldn’t stop laughing at the terrible website.
Speedy Painter - Lightweight digital painting program.
mtPaint - Originally made for pixel art; simple enough to run on older computers.
Chasys Draw IES - Supposed to be some sort of drawing+image editor thing.
PaintRibbon - Seems to be another plain old basic image editor.
DrawPlus - Looks like it’s made for graphic design and vector stuff.
SmoothDraw - I’m guessing this is a basic thing for people who don’t want to bother with complicated stuff.
More Posts from Artrefforsteph and Others
Copic Marker Walkthrough
Lately many people have been asking me how to create a space nebula effect with markers. The process is relatively simple, but it’s not easy to explain simply with words alone. So in this walkthrough I’m going to show step by step how it’s done.

First things first. This is the list of supplies I used. -Strathmore Mixed Media 5.5 x 8.5 sketchbook-Pink and White Colored Pencil-White Gel Pen-13 Copic Marlers (12 colors and a colorless blender, which I’ll explain how to use later.) I should point out now that you aren’t required to use the exact brands I used to create the drawing. I use these materials because they’re what I’m most accustomed to.The techniques I demonstrate can be done with whatever markers and paper you’re comfortable using. What matters is that you understand the technique because when you do you can apply it to anything.

I begin by making some abstract cloud-like shapes with E50 (Eggshell), which is a very faint yellow. There’s no pencil sketch here because space nebula (as well as atmospheres and natural landscapes) can be easily created by layering abstract shapes on top of each other.

Using Y21 (Buttercup Yellow) and G20 (Wax White) I basically repeat the first step. Still working very light. I realized after the fact that Buttercup Yellow was a bit too intense for this drawing so I stopped using it there. This is why it’s important to have a sheet of scratch paper nearby to test out colors before you apply them. Because once they’re down, they’re DOWN.

Next I use R20 (Blush) to start defining the shapes of the gases in the nebula. Then I go back to Eggshell. It’s probably hard to see what I did here, but I used the brush tip end (on its side) to swipe inward, from all sides, towards the center of the nebula. The reason being is that the brush tip is more saturated than the chisel tip. This helps intensify the lighter shade of yellow that’s already on the paper. If also makes crossfading colors easier because the sideways swipe motion creates a soft gradient that tapers towards the edge. I’ll use this technique multiple times throughout the drawing..

Now with B000 (Pale Porcelain Blue) I layer over the gases in the center while working my way outwards. Again I’m pulling my strokes inward because I know the surrounding space will be deep blue and I want the transition to be a smooth one.

With E04 (Lipstick Natural) I’m finally beginning to put in some of the darker colors. At this point the drawing sill looks like a random mess. Sometimes you’ll get the urge to rush and make the drawing look like something, but you have to be patient and take your time.

Using B32 (Pale Blue) and R20 again, I’m going around the nebula detailing and adding layers of color. I’m also leaving some white spaces which will later become stars. My Pale Blue is actually beginning to dry out, but here in able to make that work to my advantage because it streaks from the chisel end create a dry brush effect which helps add to the glow. The nebula portion of the drawing is beginning to take shape.

Working my way around the perimeter with Pale Blue. From here you can see the importance of working light to dark. Build your colors gradually and avoid the urge to go too dark too early. You want to have room for error and you don’t want create more work for yourself.

With B04 (Tahitian Blue) I fill the surrounding space completely. I’m not too concerned with trying to get an even layer because I know that I’m going to add darker shades of blue next.

Here I used B00 (Frost Blue) to start cleaning up some of the edges around the nebula. I also used BG15 (Aqua) to add some pockets of color in the surrounding space.

Adding darker layers to surrounding space with B14 (Light Blue), which surprisingly a pretty dark shade of blue. Then I used B97 (Night Blue) to add the last layer, which is the darkest layer in this drawing.

Now it’s time for the final details. 0 is the Colorless Blender. But it’s not necessarily used to blend. Instead it almost acts like an eraser because the ink pushes colors away when you put it down. Because of this I generally don’t use it. But it works great for things like water, landscapes and atmospheres. Or in this case, space in which I used it to pull out highlights in and around the nebula. The colorless blender is odd, but it occasionally has its uses.

This is the final step and my personal favorite. Highlights and small details. I used the pink and white pencils to color around the edges of the brightest stars to make them look as if they’re glowing. Then I used the a white gel pen to color inside those stars to make them shine and pop off the page.

And here’s the finished drawing. This was hastily put together, but hope y'all found this to be informative and easy to follow. I’ll try to do more marker walkthroughs on different subjects in the future. Until then thanks for all your support and encouragement!


Any tips on drawing mouths?
Oh gosh I will try
I do basic closed mouths like

altered pretty easily for parted lips

annnnnd teeth…

You can put as much or as little definition into your teeth as you like, but I go about halfway

And remember that it’s dark inside mouths, and that there’s a tongue in there. I’m terrible at tips, I’m sorry! Polararts has a much better tutorial haha.
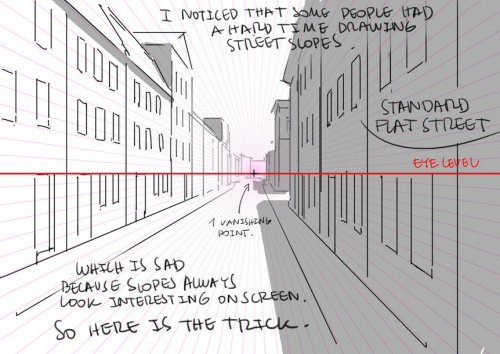
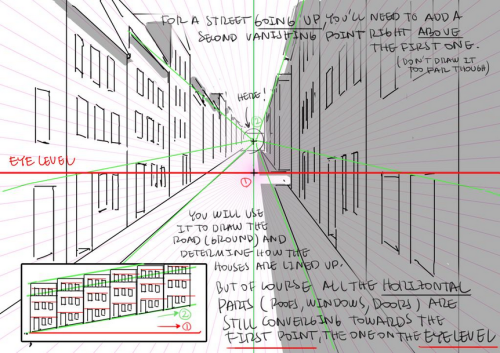
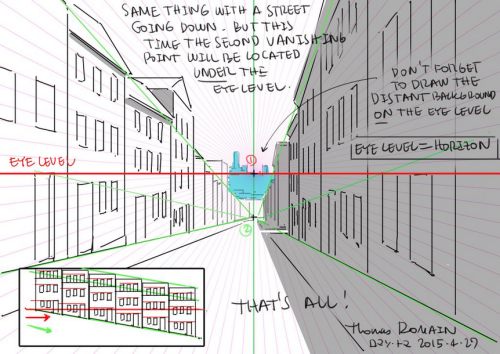
How to draw street going up & down without losing your mind.
by Thomas Romain (Space Dandy, Code Lyoko, Basquash!, E.P. Kiss Dum, Cannon Busters). Another one…


Space Brush
Just a quick brush / texture I put together to learn how to make Sai brushes.

You can get the space texture here. SET THE BRUSH LAYER ON LUMINOSITY.

Stardust Speedway - Submitted by Iamtrashlordfearme
#020421 #5E15AA #F676F3 #EFD03A #FFFCB3 #4BA5EA
art cheats
hello i am here today to not lose track of the art cheats i have discovered over the years. what i call art cheat is actually a cool filter/coloring style/way to shade/etc. that singlehandedly makes art like 20 times better
80’s anime style
glitch effect
glow effects
adding colors to grayscale paintings
foreshortening ( coil )
foreshortening ( perspective )
clipping group (lines)
clipping group (colors)
dramatic lighting ( GOOD )
shading metal
lighting faces
that is all for today, do stay tuned as i am always hunting for cool shit like this
Hi! I really love your art and I'm wondering if you should show me how you color and shade. thanks! :)

tadaaaaa!
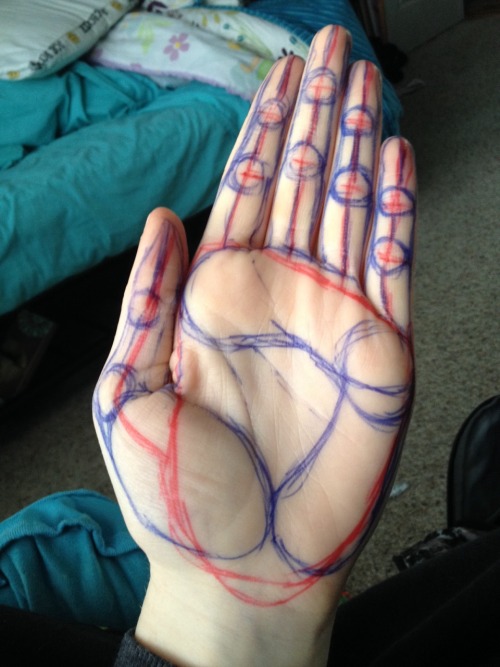
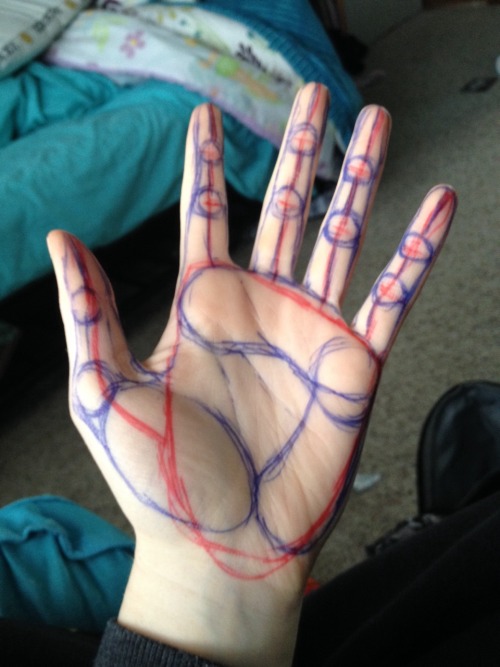
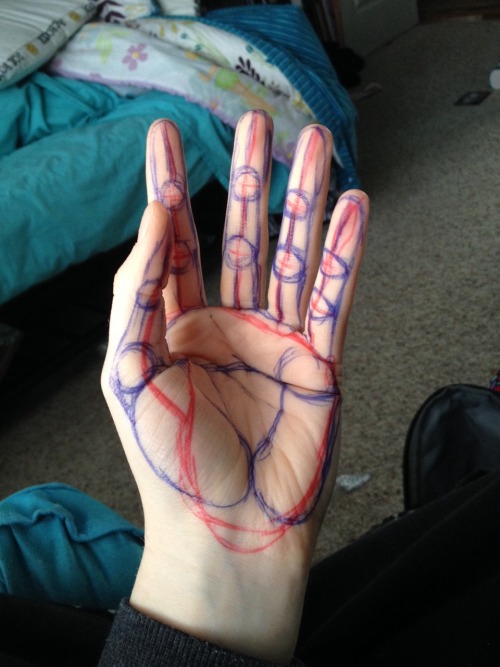

I always struggled drawing hands before anyone told me what to do. So here is a HANDy dandy drawing reference to see the steps on an actual hand. There are three big muscles in the palm. The thumb lump is most important because without it you’ll never even get the shape right. Circle up the knuckles and draw bendy lines (red) to connect them. Make sure the fingers go from medium-tall-short-shortest just slightly (index=>pinky finger). Notice the big red squareish shape around the palm-that’s the first thing I do. Note: every infer has 2 knuckles don’t forget the thumb does too…just in a weird way.
-
 princessbees reblogged this · 2 months ago
 -
 beinghumaniac13 liked this · 2 months ago
 -
 gabbydearest liked this · 3 months ago
 -
 fearless-stormclaw liked this · 4 months ago
 -
 aphfroghat liked this · 4 months ago
 -
 dumbdeadhead reblogged this · 4 months ago
 -
dumbdeadhead reblogged this · 4 months ago
-
 door88 liked this · 7 months ago
 -
 throwaway-111 liked this · 9 months ago
 -
 calamitymaiden liked this · 9 months ago
 -
 all-the-beautiful-chaos liked this · 10 months ago
 -
 greattyphoontimemachine liked this · 10 months ago
 -
 anime-to-the-t liked this · 10 months ago
 -
 jasmine-tron liked this · 10 months ago
 -
 kthnxbyeeeee liked this · 11 months ago
 -
 muconflao liked this · 11 months ago
 -
 juniperize liked this · 11 months ago
 -
 ojodebuey liked this · 11 months ago
 -
 shufflet reblogged this · 11 months ago
 -
shufflet liked this · 11 months ago
-
 sparkybestboi liked this · 11 months ago
 -
 raeraesmentality reblogged this · 11 months ago
 -
 handinclaw liked this · 11 months ago
 -
 pinkrangersarah liked this · 11 months ago
 -
 darth-salem-emperor-of-earth reblogged this · 11 months ago
 -
darth-salem-emperor-of-earth liked this · 11 months ago
-
 shadowmellow liked this · 11 months ago
 -
 crazy-grrrl-on-the-computer reblogged this · 11 months ago
 -
 koolkitty9 reblogged this · 11 months ago
 -
 dolliedeer liked this · 1 year ago
 -
 twins-resources reblogged this · 1 year ago
 -
 ionlywannaseeart liked this · 1 year ago
 -
 artking-4 reblogged this · 1 year ago
 -
artking-4 reblogged this · 1 year ago
-
 mrcguy15 reblogged this · 1 year ago
 -
 mjimen19 reblogged this · 1 year ago
 -
 deathlaw reblogged this · 1 year ago
 -
 myfireflyinstardustedskies-blog liked this · 1 year ago
 -
 iusedtohavesixtoes liked this · 1 year ago
 -
 distantoftheland reblogged this · 1 year ago
 -
distantoftheland liked this · 1 year ago
-
 dragonbleps reblogged this · 1 year ago
 -
twins-resources reblogged this · 1 year ago
-
 orange-swordsman liked this · 1 year ago
NSFW because there will probably be nude refs | this is a side blog to sort all of the art stuff I need | none of it is mine
151 posts