Parents: Why You Wanna Move So Bad
Parents: why you wanna move so bad
Me: independence
Me in head: gettin a lizard
More Posts from Shusheerhshsheshhh and Others
The couple that danced the whole block down ❤


I couldn’t decide whether to add highlights or not. so here are 3 versions of Joji to bless your evening ▼ω▼
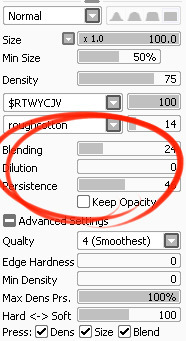
Mini SAI guide - "Blending (color blending)", "Dilution (opacity mix)", and "Persistence" settings.
I’ve had a general idea what these things did but wasn’t completely sure what their specific functions were. I decided to sit down and figure it out, and I have thrown together a short reference guide for anyone who is confused about them. I know there are multiple translations of SAI floating around, so if some of these terms don’t sound familiar, just know that I’m talking about the three settings that appear under the texture in the brush tool settings (note that this won’t apply to any tool types except for brushes and watercolor brushes).
I don’t claim to be an expert so if you find I’ve made a mistake, let me know so I can update it, thanks! :3
—-
BLENDING (Color Blending)
This controls how readily the brush will inherit any colors you are painting over with it. For example, a 0% blending setting will pick up no existing colors, treating it as if you were painting on a transparent layer. A 100% blending setting will ONLY pick up existing colors (provided there are any). So at 100%, the color you’re using won’t even show up, unless you move to a transparent area. Blending is not affected by transparent pixels, so if you’re drawing on a blank layer it will have no effect.

So you can see from this example that the color I’m using gets harder to paint as the blending increases and more of the existing green is absorbed, until at 100% it is just completely turning green.
—-
DILUTION (Opacity Mix)
This controls how readily the brush will draw on a blank (transparent) part of the layer. A 0% Dilution will result in the brush painting very easily onto a blank surface, while a brush with 100% dilution will literally not paint on blank parts of the layer at all. Dilution is ONLY affected by transparent pixels. So it won’t do anything if the whole layer is already filled in (even with white). Dilution can be thought of as the inverse of the Blending setting in some ways.

So in this example, you can see that as dilution approaches 100%, the color I’m painting with basically becomes invisible. In fact, if you were to switch to binary color mode and look at this layer, there would literally be nothing there anymore!
Keep this in mind - if you ever can’t paint for some reason, check your dilution setting, it might have gotten accidentally bumped to 100!
—-
PERSISTENCE
This one goes hand-in-hand with blending. Basically, it controls how easily a brush shifts color as you are blending from one color to another. Rather, how long it “persists” if you will. Like blending, Persistence is only really relevant when painting over existing color so it’s mostly unaffected by transparent pixels. Basically, the higher the persistence, the longer it will take for the color to shift as you make a stroke, and subsequently, from which color to which other color it is shifting is dependent on the blending setting.
So for this example I’ve done the same test with three different levels of blending. I turned off all pressure sensitivity (actually I just used my mouse) to emphasize the effects in a controlled environment:

If blending is at 0%, persistence fails to have any real effect. With pressure on, there is only the difference of having to push harder, but the results will be the same as far as I can tell.

At a happy medium of 50%, persistence increase causes the orange that the brush is picking up to last longer as it goes into the green, until it never shifts to blue at all.

At 100% blending, there was never any blue in the first place, because as we already know, full blending causes you to only pick up existing color. So the persistence setting changes only how fast the orange changes to green.
Persistence is dependent upon the blending settings, so having them somewhere in the middle will probably produce the most optimal results.
—-
CONCLUSION
Ultimately how you use these is up to you, and is largely dependent on what kind of brush you’re making and what it will be used for. And most of these settings are meant to be used together in unison, so play around with them a lot!
If you are confused, or not sure what settings you want or what settings you should be using, a safe bet is to put them all at about 50% - that will produce fairly average results that are easy to work with, and it’s easy to remember in case you want to experiment but don’t want to forget your settings in case you decide to switch back.
Hope that helps!
If you live in Beirut or know anyone who's there please spread this message.

Hotel chbat bcharre
Madraset el 3azariye ajaltoun fet7a bweba iza bta2erfo hada ma 3ando mahal ynem el layle!
03292494


Really crappy/quick tutorial on how I draw muscles?
I tend to draw muscles very simply, and there are tons of other tutorials that are waaaaayyyy better! But I hope you enjoy yungterra!

Nasa lemme design your Space suit @nasa @nasa
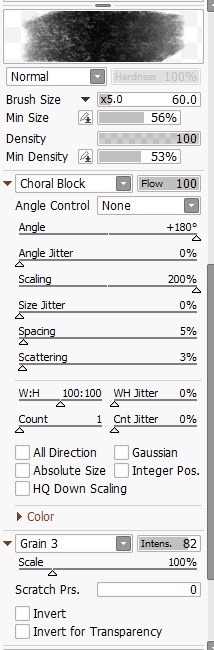
Procreate HB and 6B Brushes for Paint Tool SAI 2 (January Update 25.01.2020)
Paint Tool Sai is a well known software for Windows in the digital art field, it is light software and easy to understand and work with. However classic Sai lacks a lot of advanced features and brush settings, but thanks God Beta Sai Ver 2 - 25.01.2020 update specifically- added revolutionary features that advanced the usage of paint tool sai; Such features as Perspectives rulers, scatter brush, effect brush, brush groups and dynamic rulers and more!! i highly recommend switching to Sai ver 2 Beta as i guarantee its current smooth flow without lags.
Also those who tried procreate are fascinated with its HB and 6B brushes , and many wanted to have these tools for sai.. So i made these brushes available for sai using the scatter brush which is only found in Sai ver 2.

Follow the link given below and :
copy the files with similar names (BMP and .int) to the following destination C:\Users\Username\Documents\SYSTEMAX Software Development\SAIv2\settings\scatter
Copy the Grain BMP file to C:\Users\Username\Documents\SYSTEMAX Software Development\SAIv2\settings\brushtex
Create new scatter brush, select the brush shape and texture and adjust settings
I suggest playing with the density and tweak some settings to experience and understand how scatter brushes work
Happy Drawing!!
https://mega.nz/folder/vkNhgSxb#bd2Bi7WlwhqycD_SxEbHlA
PLEASE KEEP IN MIND :
You can use these brushes without crediting me ( shoutouts are good tho)
Do not claim that these are your work, do not sell them, and reposts are prohibited 🚫
ALWAYS LINK THIS PAGE IF YOU WANT TO TELL ABOUT THESE BRUSHES ON ANY OTHER PLATFORMS.
DO NOT REMOVE THE TAGS
Here are some examples i drew with these brushes ( my art sucks ik hope u don’t hate on the brushes tho lmao)
HB BRUSH


6B BRUSH

Welp i am sandwichman i like this brush for children comics work


More chubby bby Enji, i missed to draw those bby rolls so much❤❤
-
 i-am-just-here liked this · 1 month ago
 -
 daengeli liked this · 3 months ago
 -
 itsflores2 reblogged this · 4 months ago
 -
 the-doll-attachment liked this · 4 months ago
 -
 dragonsong27 liked this · 4 months ago
 -
 quinz86 liked this · 4 months ago
 -
 nihalalt reblogged this · 4 months ago
 -
nihalalt liked this · 4 months ago
-
 trololohstuffs liked this · 4 months ago
 -
 negasonicteenagebreakdown liked this · 4 months ago
 -
 uraniummm-m liked this · 4 months ago
 -
 not-tumbling liked this · 4 months ago
 -
 populationtyre reblogged this · 4 months ago
 -
 caktoz reblogged this · 4 months ago
 -
 carrionmansion reblogged this · 4 months ago
 -
 kvarlevor reblogged this · 4 months ago
 -
 breathe-deep-or-not-at-all liked this · 4 months ago
 -
 lordfell reblogged this · 4 months ago
 -
 s-h-y-y-a-n-n-e liked this · 5 months ago
 -
 notsofriendlybooks liked this · 5 months ago
 -
 madamemaddy liked this · 5 months ago
 -
 a-deadly-serenade reblogged this · 5 months ago
 -
 anna4unbu liked this · 6 months ago
 -
 annalripg liked this · 6 months ago
 -
 annita892415fybph liked this · 6 months ago
 -
 tothearkwego reblogged this · 7 months ago
 -
 baxterthebunnychronicles liked this · 7 months ago
 -
 weirdlittletoasterboy liked this · 7 months ago
 -
 squarebracketsmileyface reblogged this · 7 months ago
 -
squarebracketsmileyface liked this · 7 months ago
-
 lovedbz1 reblogged this · 7 months ago
 -
 altusbloom liked this · 8 months ago
 -
 berriesimbloom liked this · 8 months ago
 -
 par-vollen reblogged this · 8 months ago
 -
 julx97 liked this · 9 months ago
 -
 junohaven liked this · 9 months ago
 -
 void019 reblogged this · 10 months ago
 -
void019 liked this · 10 months ago
-
 aavveerrii reblogged this · 11 months ago
 -
 travellersdimansion liked this · 11 months ago
 -
 can-u-smell-that-thats-comedy reblogged this · 1 year ago
 -
 ripriprippers liked this · 1 year ago
 -
 doggofactory liked this · 1 year ago
 -
 beetleandfox liked this · 1 year ago
 -
 salainen liked this · 1 year ago
 -
 nenehyuuchiha reblogged this · 1 year ago
 -
nenehyuuchiha liked this · 1 year ago
