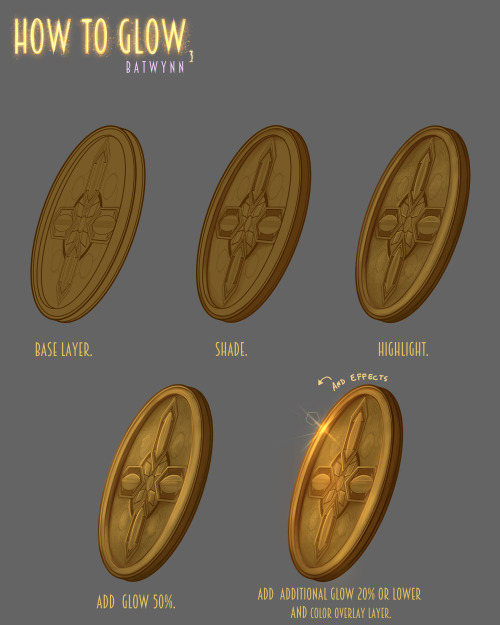
Follow Your Passion: A Seamless Tumblr Journey
How To - Blog Posts
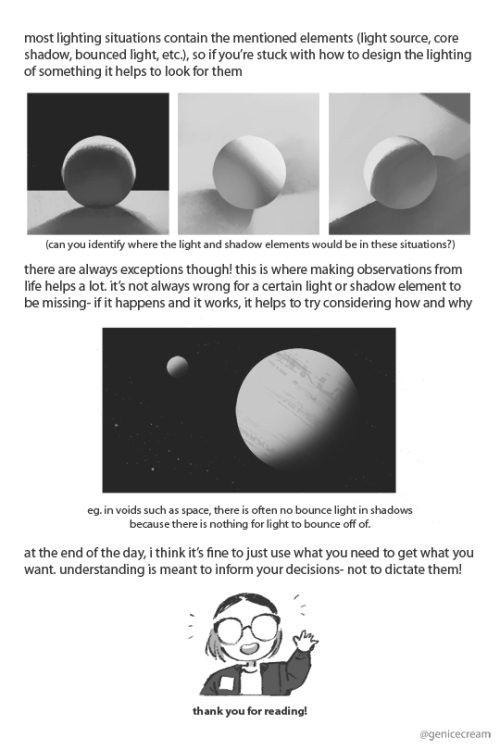
this guy... still hilarious and still helps a lot when it comes down to survival
What or who is perfect?
We all have our models, and all kinds of subjects of admiration. And that is good, to some extent... It makes us push harder or just push at all. If I read a decent piece of literature, it reminds me how much I could be advanced and how many details I could fix in my previous works. And I repeat, it's a tremendous thing. We inspire each other in an endless cycle for we all are role models sometimes and we are the followers at other times.
Could I end it here? Maybe I could but shouldn't or should but just can't... Is the basic idea of perfection purely motivational and constructive? Sadly no. As long as we're moderate and wise, it helps us improve and there's always room for that... But perfection in itself is not a reason for us to act one or another way, or to change. We have to have a vision, a goal and on our way towards them, these small images of perfection will keep us getting better and better.
It's about time for me to end but I just can't leave it out: perfection is a question of the taste of the observing entity. That's why we are so brave to label things as perfect. But it just doesn't exist, at least not in this world. A question of perception. Mathematicians could argue but... Well I don't know what to say of that but I'm always ready for a little discussion...
Bottom line: love the perfect things and know, that to certain people, ones who you probably don't even see, You are perfect, too.
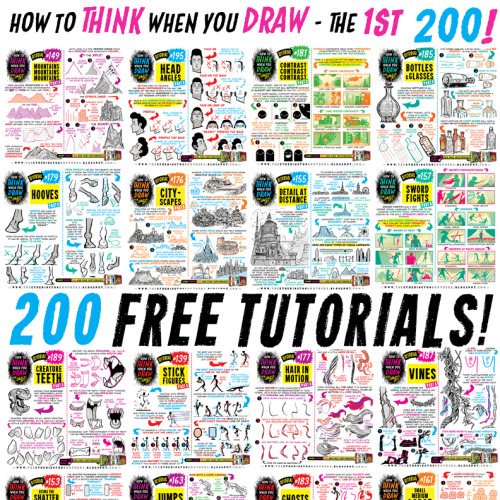
The ONLY WAY to combat the lack of funding in arts education is for professionals to take a few hours a week to share their skills for FREE, to empower and encourage the next generation of artists. THIS IS WHAT THE INTERNET IS FOR. Here’s 200 tutorials:
How to draw ANGRY EXPRESSIONS How to draw BATTLE DAMAGE How to draw BIRD HEADS How to draw BOOKS How to draw BOTTLES and GLASSES How to draw BOXES How to draw BREAKING GLASS How to draw BRICKWORK How to draw CABLES and WIRES How to draw CAR CHASES How to draw CATERPILLAR TRACKS How to draw CAVES How to draw CHARACTERS (3-SHAPES) How to draw CHARACTERS (FLIPPED-SHAPES) How to draw CHARACTER SHAPES How to draw CITYSCAPES How to draw COMIC COVERS How to draw COMPOSITION How to draw CONTRAST How to draw CONVERSATIONS How to draw CREATURE TEETH How to draw CROSS-CONTOURS How to draw DETAIL AT DISTANCE How to draw EARS How to draw FABRIC How to draw FEET & SHOES How to draw FEMALE HANDS PART ONE How to draw FEMALE HANDS PART TWO How to draw FLAGS How to draw FOOD TRUCKS How to draw FOREGROUND MIDGROUND BACKGROUND How to draw GAME BUILDINGS How to draw GEMS and CRYSTALS How to draw GHOSTS How to draw GIRL’S HAIR How to draw GOLD How to draw GRASS How to draw HAIR (1940s styles) How to draw HAIR IN MOTION How to draw HAPPY EXPRESSIONS How to draw HEAD ANGLES How to draw HOOVES How to draw HORNS How to draw HORSE HEADS How to draw IMPACT DEBRIS How to draw IN 3D How to draw INTEGRATING LOGOS How to draw INTERIOR BASICS How to draw IN-WORLD TYPOGRAPHY How to draw JUMPS How to draw JUNGLE PLANT CLUSTERS How to draw JUNK HOUSES How to draw LAMP POSTS How to draw LAVA How to draw LIGHTNING and ELECTRICITY How to draw MECHANICAL DETAILS How to draw MUSHROOMS and FUNGUS How to draw MONSTER HEADS How to draw MONSTER TENTACLES How to draw MONSTER TRUCKS How to draw MOUNTAINS How to draw NEGATIVE SPACE How to draw NEWSPAPERS How to draw NOSES How to draw OVERGROWN VEGETATION How to draw PEBBLES AND GRAVEL How to draw PERSPECTIVE BOXES How to draw PIGS How to draw PILLOWS and CUSHIONS How to draw POD HOUSES How to draw POURING LIQUID How to draw ROBOT ARMS How to draw ROCK FORMATIONS How to draw RUNNING FIGURES How to draw SAND How to draw SAUSAGE DOGS How to draw SEA WEED How to draw SHADOW COMPOSITION How to draw SHOULDER ARMOUR How to draw SIEGE WEAPONS How to draw SILHOUETTE THUMBNAILS How to draw SMALL FLAMES How to draw SMALL, MEDIUM, LARGE How to draw SMOKE EFFECTS How to draw SNOW How to draw SPACE BIKES How to draw SQUIRRELS How to draw STICK FIGURES How to draw SWORD FIGHTS How to draw THE HORIZON How to draw TIKI STATUES How to draw TREASURE CHESTS How to draw TREE BARK How to draw TREE ROOTS How to draw USING THE SHATTER TECHNIQUE How to draw VEHICLE STANCE How to draw VINES How to draw VINTAGE PLANES How to draw WATER How to draw WOODEN HOUSES
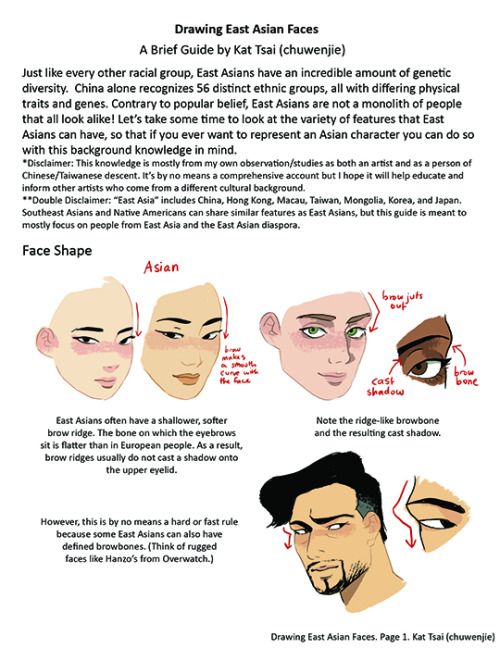
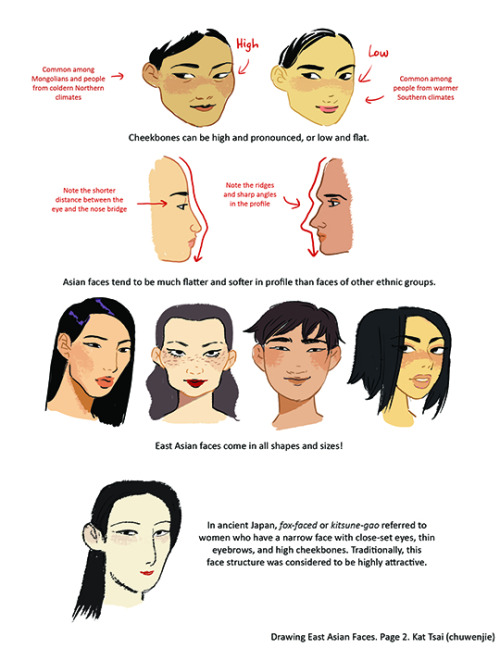

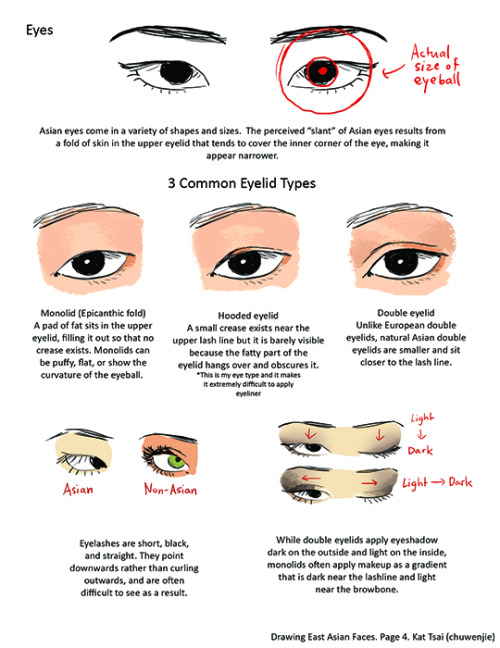

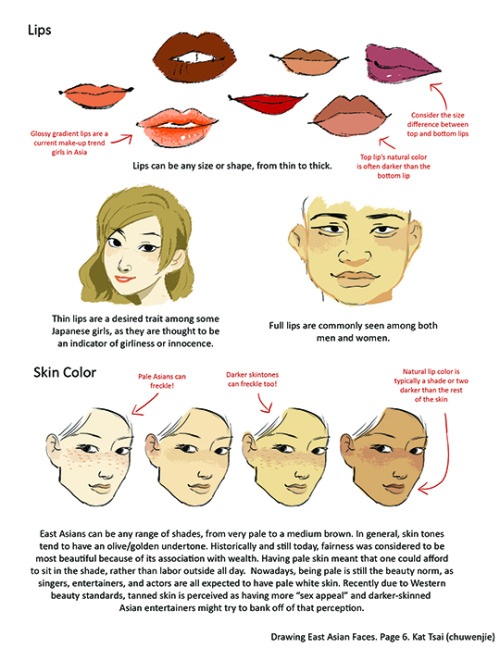
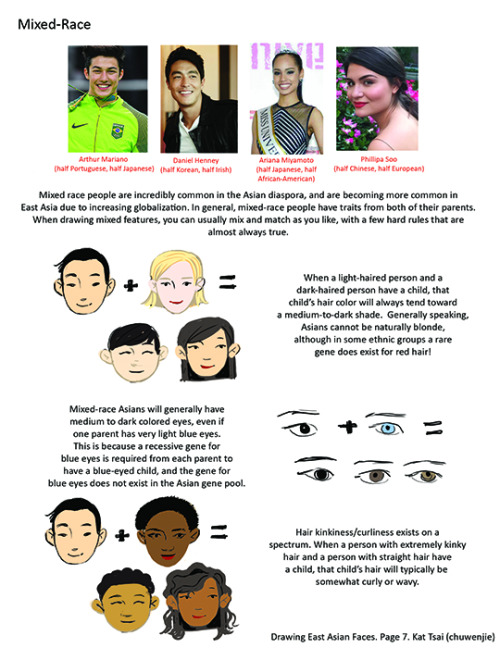
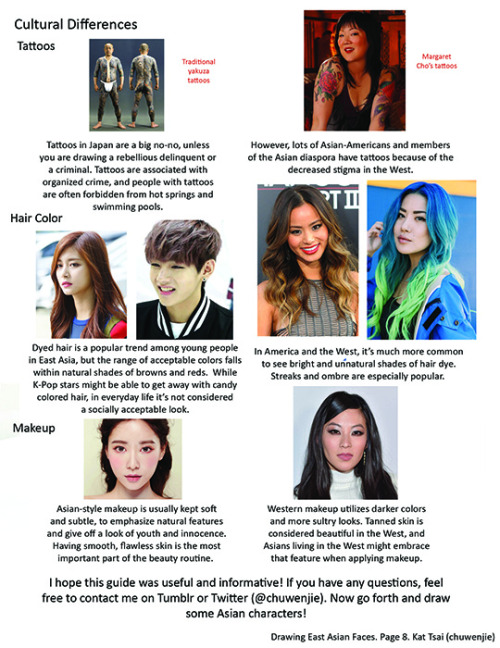
A compilation of stuff I know about drawing Asian faces and Asian culture! I feel like many “How-To-Draw” tutorials often default to European faces and are not really helpful when drawing people of other races. So I thought I’d put this together in case anyone is interested! Feel free to share this guide and shoot me questions if you have any! I’m by no means an expert, I just know a few things from drawing experience and from my own cultural background.


Wandered into an article with 140 iconic cinematic shots, the comments complained there was no explanation to their composition. Decided to give it a run down and keep it to myself.
The compositions are mostly self explanatory but I wanted to see what patterns I could find. That’s just how you learn stuffs.
How to show expression with the mouth!
This was a request and at first I wasn’t sure if I had anything to provide with, but as it turn out it got a little longer than I expected because there were actually things I had to say!! Wow!!
Anyway, this is some guidelines I follow when I try to make the face expressfull, more specifically the mouth! It is often neglected, since it’s actually pretty hard, I’ll admit. But I’m here to help (hopefully…)! A mouth expression tutorial as per request. Enjoy and hopefully it will help some a little. ʕ•ᴥ•ʔ
Draw the teeth at the right angle.
This is super important. The upper jaw follows the angle of the head, and the lower jaw will depend on how open it is. Make sure you have a rough estimate of where the teeth are, and how much of them you’re going to see!
The lips will VERY roughly follow the same angle as the teeth. It really depends on the character, but it gives you a sense at least.

If you DON’T do this, you’re going to lose so much volume and the mouth is going to end up looking unrelatable. I showed this example in this tutorial:

It’s not just the lips!
The cheeks, chin, and tongue play a role too!

Try look at your own mouth or references! I have a very pliable and large mouth, so that’s one reason why my characters have it too lmao.
ASYMMETRYYYYY (ง ͠° ͟ل͜ ͡°)ง
I cannot emphasize how important asymmetry is when drawing expressions. It applies not only to the eyebrows to achieve the Dreamwork Face™, but also the mouth. Seriously if you draw a symmetric mouth I will deliver myself to your mailbox and then shout at you until you fix it.
Look at the difference between these two for example: which one has more “life”?

I think you get the idea.
Push and squish - give it flow
Here’s an old drawing I have but it illustrates how I think when I squish the mouth, and use folding and wrinkles to my advantage.

Look at your own face and see where skin bundles up, where it creases the most and when bumps appear on your chin. Subtle details makes all the difference!
One VERY effective detail is illustrated in the first sketch, where I pull upwards on one side, and downwards on the other. That’s a good detail to use when the character is making a skewed expression, or is extremely frustrated. I encourage you to play around with that concept bc it’s ~super effective~!
EXAMPLES:
Happy: Your entire mouth is pushed upwards, not just the corners of your mouth!

I tend to draw a :3 mouth bc I’ve been drawing Lance too much….. You don’t have to but it’s basically imprinted in my motor memory by now.
Pouting/frowning: corners are pushed down, middle pushed slightly up. Sometimes, there’s a slight dip in the middle too. It can give a sense that the character is biting their lips.

Showing frustration/intimidating/is intimidated: basically showing a lot of teeth. The corners are as open as possible and the middle sorta more squished. An extremely important detail here is showing some of the gums, and open space between the cheeks and teeth. That way it looks like the mouth it open to it’s full potential. Here is also where you basically MUST add folds and bumps, or else it’s not going to look relatable.

(Here I am again with the pulling upwards on one side and downwards on the other, as illustrated on the last sketch)
And then again, here’s just another doodle showing how important it is to show the gums. It’s the same face twice, but the second one looks slightly more frustrated doesn’t it?

(from my other tutorial on how to draw facial expressions)
As you can see, this last one is very versatile and I draw it a lot. Play around with the basic shape and see how much subtle details makes a lot of difference!
That’s it!
I hope that cleared some things up and was somewhat helpful! Enjoy drawing ✨


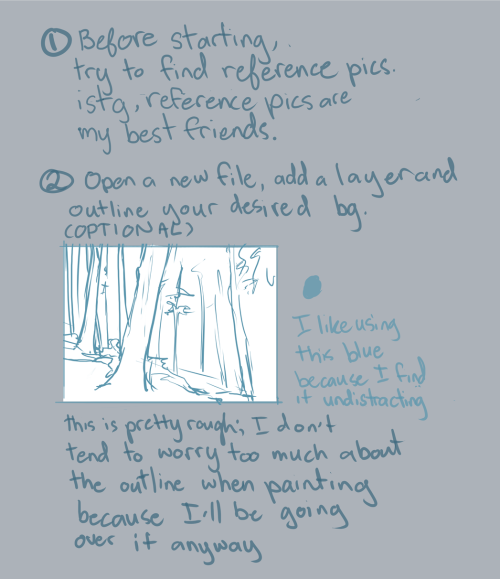


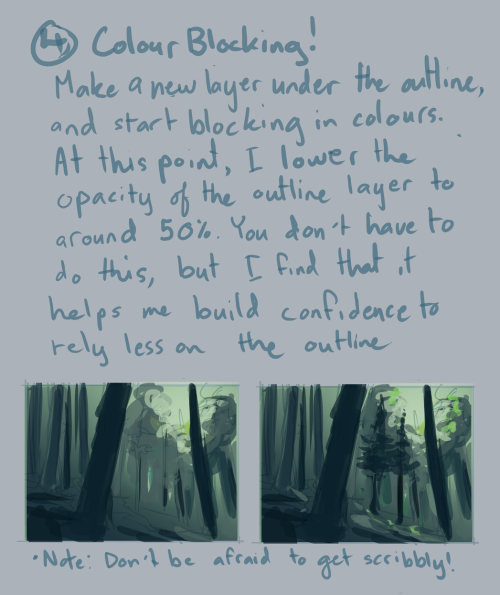


Background Tutorial
requested by ion4ever. sorry it took me so long to do this for you but hopefully I was of some help?
Notes:
I use CS6, and this was mostly done with default hard round brush at around 50% opacity or higher, 100% flow, and size pressure on. I made some random brushes for the greenery by modifying the default ones.
always use a large canvas. I go about 3000px x 3000px.
with enough practice, painting backgrounds like this will be a fairly quick affair. this one, for example, took about 30 minutes? it’s just a matter of time/experience. :)
So yeah, good luck doing backgrounds, and have fun!! :D
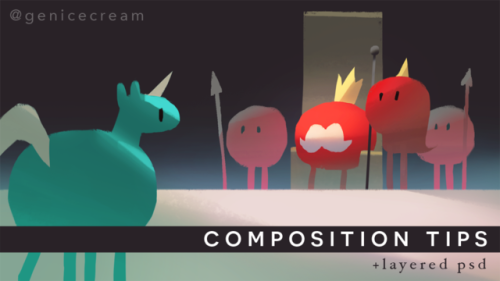
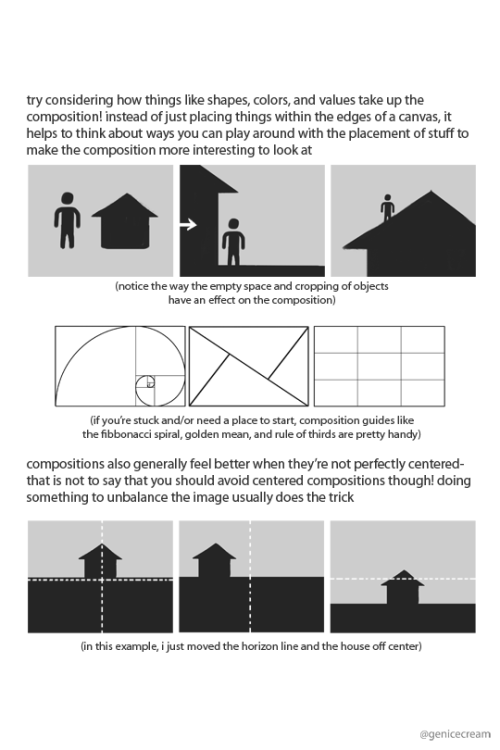
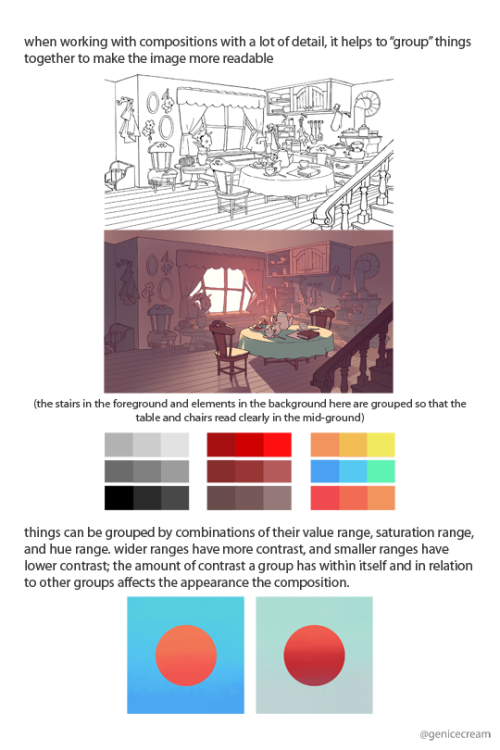
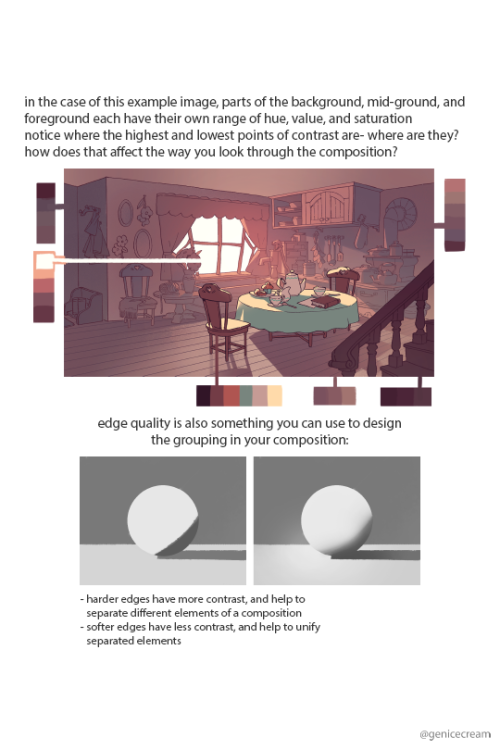
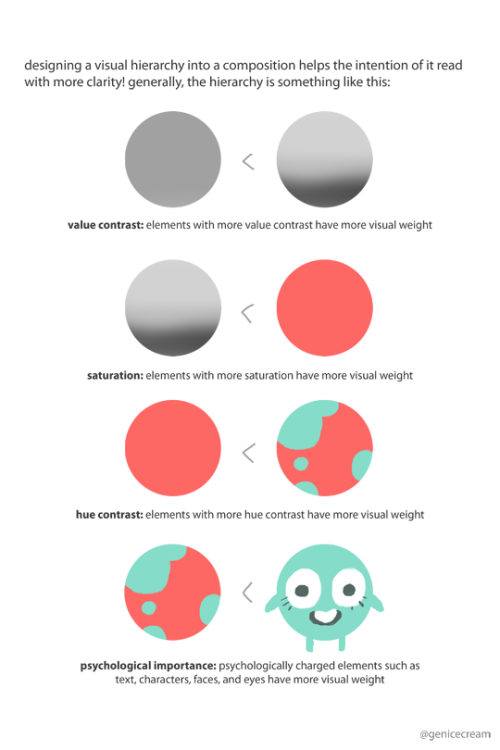
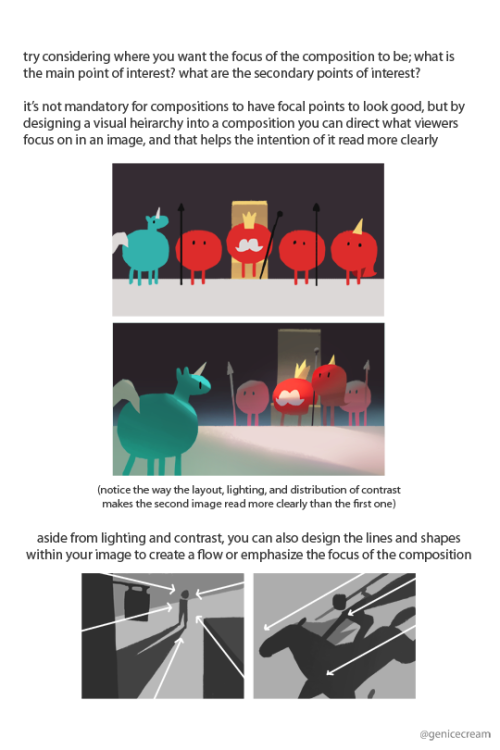
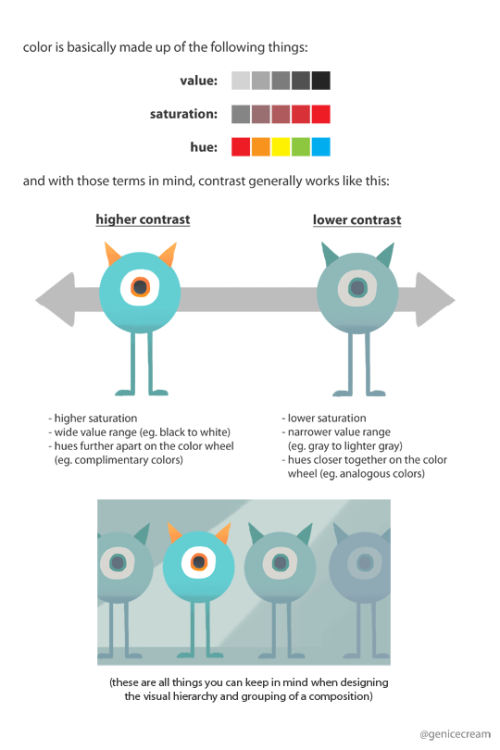
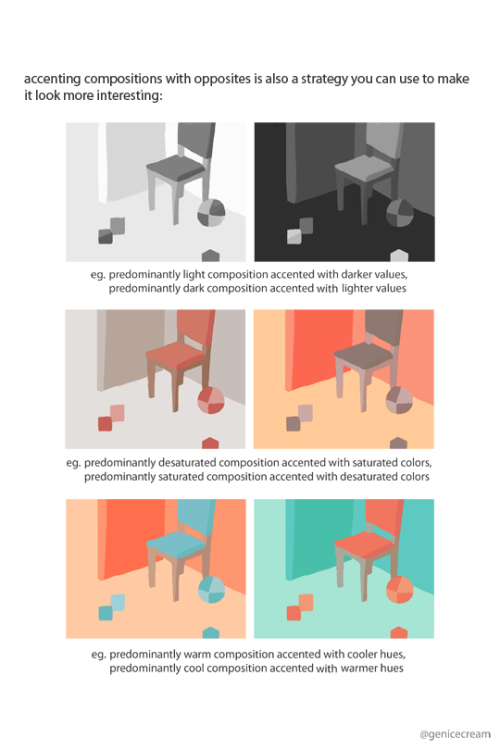
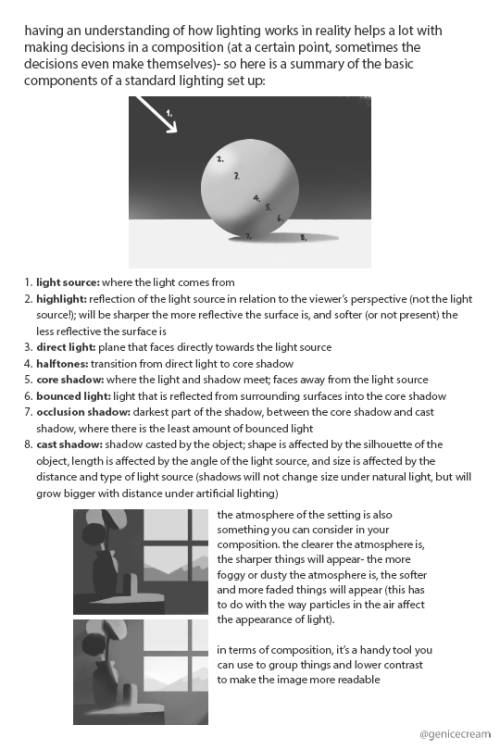
a series of composition tips i’d been sharing on twitter!
and since some people had asked, i’ve put up a pdf version of this on gumroad along with a layered psd of one of the example images too
tips would be really appreciated, but it’s up for free!

Persian cat Drawing process #cat #cats #animalart #animals #cute #adorable #art #myart #digitalart #process #progress #artwork #sai

Cat face in colour:p #cat #cats #animals #animalart #cute #draw #drawing #digitalart #art #style #study #myart #sketch #sai #instartist #bigeyes #colour #photoshop
I actually have 2 stories about this at the same place!!! The first one happened to my roommate, who I worked at the same place with.
We worked at a charity retail store and we were both placed in the clothing department. Which meant all we did was go through giant bins of donated clothes and hung up what could be sold. Really really simple. Not a single customer ever saw us as we worked in the back.
My roommate had a sprained ankle. Also note: we lived down the street and down a hill from the store. We didn't have cars. We walked to and from work from 7 am to 3 pm. My roommate was using a stool to sit on and hang clothes. She got dirty looks from coworkers the entire time and every single time she left to use the restroom or take her breaks or whatever, they'd HIDE her stool!
The second story actually happened to me. I started working there shortly after that so I knew how they felt about sitting at work. But I did not care. We walked to and from work every day and some days we had to make grocery trips, which consisted of us bringing our own bags and filling them with groceries, paying, and lugging the 10 large bags home between the 2 of us. We did that in snow and rain. We didn't have a choice. So I REALLY did not care that my coworkers didn't like that I felt like sitting. I didn't sit my entire shift. I only sat about an hour or two before my shift ended so I could give my feet a break before I had to walk home or get groceries etc. But the LOOKS I got!!! My god!!! They kept taking my stool too whenever I walked away, but I'd just grab another one that wasn't being used.
I have one more story regarding sitting at work in a retail setting. This is a different job. I replaced an elderly woman at a crafts store as she had fallen ill and I think needed surgery. She was recovering for months but I kept hearing stories about her from coworkers. So when I heard she was finally coming back I was excited to meet this legendary woman. When she got back we were both assigned as the cashiers for our shift together and she sat behind the counter in a stool. You know what???? I didn't question it!!! I was fine with her sitting!! I wanted to sit! I wouldn't have cared if she was young and had no health issues and still chose to sit for her shift! She still did the work.
Now for the scary part, because whenever I think of this lady I always think of this moment. We had radios and earpieces at this job for quick and efficient communication. We had a line and we were both taking care of customers. All of a sudden I hear her say over the radio "I'm not feeling well. I think I'm going to pass out." It honestly took me 10 seconds to register what she even said. But as soon as it registered, I stopped what I was doing and looked over at her to see her falling out of her stool, eyes rolled back, falling backwards over herself. I had never experienced this before! Wth??? My body started moving and I started yelling frantically over the radio and a customer called the ambulance. Everything both felt like slow motion but also very fast. She's fine!!! She came to a few minutes later. She decided to retire after that and she stopped working.
Anyway, those are my stories about work and chairs.
“Its lazy for cashiers to sit down
And it’s weird to care. Work shouldn’t be an endurance test. Let me sit. We’re not doing a survivor challenge. You don’t think people can sit down and work at the same time? You’re gonna be real mad when you find out what an office is.”
Best Simple Cabbage Soup With Ground Beef 🍲 In The Slow Cooker
Cabbage soup recipes are easy to make and affordable.
Cabbage soup is a simple, healthy, and inexpensive dish that can be made in a matter of minutes. It’s also a healthy alternative to many other dishes that are less nutritious.

So I decided to give myself a sharpie tattoo tonight :) I’ve been vaguely imagining having a “God is Love” (1 John 4:8) tattoo for quite a long time, but I’m afraid of both needles and decisions and thus have not done so as yet.
But I’ve been seeing these pictures of Gerard Way with sharpie tattoos and I was just like “there is no reason I should not give myself a sharpie tattoo right now” and so... I did.
See beneath the cut for step by step pictures and general rambling :)
I put it in the spot where I would get a real tattoo if I ever get around to getting one; I have a big weird scar about halfway up the outside of my left calf and I figure if I were to get a proper tattoo, that’s kind of an ideal spot for a tattoo anyways and I might as well cover my scar with one.

As with any good scar, there’s a long story to it, but (gross-out warning, mild medical violence warning) basically I had a spider bite that got infected and it swelled up into this big nasty boil-ish, welt-ish thing that lasted for an uncomfortably long time. When I went to the doctor with it, they pretty much just stabbed it twice to get it to drain and it left me with this. It’s hard to get it to show up very well but it’s basically two deep divots in a patch of pale, off-texture skin, a bit bigger around than a quarter.

So I knelt on my bed with my leg at an awkward angle, whipped out my treasured 30 pack of rainbow sharpies (minus like 3, because sharpies like to run away), and went to work. It was kind of a weird angle to draw at not only because of how I had to bend my knee but also because everything I was drawing was sideways, but the heart turned out fairly nicely, if a bit lopsided.

I didn’t make the heart quite big enough to fit “God is Love” inside of it so I wound up with the love bit underneath. I’m fairly pleased with how it looks, although you can definitely tell from the “e” that I was working sideways.

I liked it well enough, but I wanted more color, and so I decided to add a butterfly wing to the left--or perhaps a flower. I have a tendency to draw those rather similarly so it’s basically both. One flower lead to another, then another, plus a couple of vines; I have progress pictures with each individual piece I added, but to prevent this post from going on for too long, I’ll just jump back to the final design.
Also, side note, my knee was stiff as all heck after sitting like that for all the time I was drawing, and I had to limp around the house a bit to get my leg to straighten back out. In hindsight I would advise taking more breaks during the drawing process when sitting with one’s leg at such a weird angle.

The main picture at the top is from that stage as well, but then I went and googled “sharpie tattoo” because I remembered something about there being a way to make them last longer. I found this, which said to cover it in baby powder and spray it with hairspray. I don’t really use hair spray regularly, but I was pretty sure I had some around somewhere; the first stuff I found actually turned out to be a spray can of hair mousse, though, so I just patted it around on top of the baby powder. I didn’t quite get the whole thing covered because I was worried about smudging it if I rubbed it around.

I was fairly certain I had some actual hairspray somewhere; eventually it occured to me to look in my old dance bag, because the last time I used hair spray was probably my 9th grade dance recital. I was correct, and upon locating said dance bag, I found both hairspray and an abundance of nostalgia. I reapplied baby powder and sprayed it on. Having not been used in nearly a decade, the hairspray came out in a confused trickle rather than a spray, and the whole area became very wet as I tried to pour out enough spray to cover the design in its entirety. The ink started to bleed and, while pretty, I was worried that rather than preserving my sharpie tattoo I was going to rinse it off prematurely in a flood of aged hairspray.

I quickly dabbed at the flow with a bit of toilet paper, and in doing so accidentally made a rather lovely watercolor on the paper.

So, this is where things are at now. The baby powder did leave quite a bit of texture on my leg. I imagine it will rinse off, but I think for tonight I’ll let things ‘set’ before I try and rinse it. Perhaps it would’ve been better if I’d left the initial design without putting any of this on it, but hopefully this will help it last longer. It’s just fun to have something bright, colorful, and meaningful on my leg.
I’ve been really digging Killjoy aesthetics lately and I love the whole culture of being bright and colorful and unique that they have, and as I’ve been conceptualizing my Killjoy OC (cosplay to come, if I ever get around to it), I’ve found myself thinking about how I’d want to ideally design... well, myself, and so I guess this sharpie tattoo was really born from that.
Along those same lines, I’ve also been revisiting the idea of dyeing my hair. It’s something I’ve contemplated since middle school but never done, but now I really think I would like to. Again I’m at least partly inspired by Gerard Way, both in the sense of the bold hair colors of the Killjoy universe and from seeing how many great hair styles and colors Gerard’s had over the years. I’m not fond of the idea of cutting my hair, but I like the thought of mixing it up by dyeing it.
The wrench in my plans right now, though, is the way that everything is just on hold at the moment. Specifically, I’ve been in rehearsals for a play, but with this whole pandemic business, our rehearsals are suspended and our play is postponed for an unknown period of time. The play is the Crucible, and unfortunately, neon red violet hair would not fly in puritan Salem. My plan initially was to dye my hair as soon as the play was over in early April, but now, well... who knows how long it’ll be until the show happens and I’m in the clear to mess with my hair. So, stay tuned for that I guess. I don’t know if I’ll wait to do my Killjoy cosplay until I’m able to dye my hair; I would like to have both this sharpie tattoo and dyed hair at the time of said cosplay, but I’m not certain whether those time frames we’ll overlap. We’ll see.
Anyways, if anyone’s still reading this, thanks for sticking with me through my rambling! I hope you have enjoyed this episode of Violet’s adventures in sharpie tattoos.

Victor Vasarely, Untitled, 1978
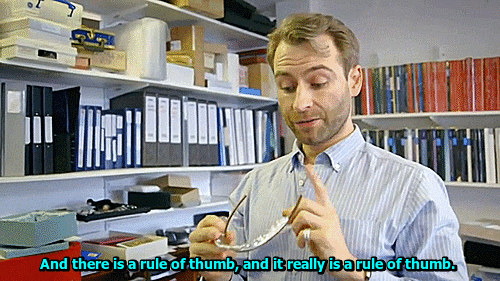
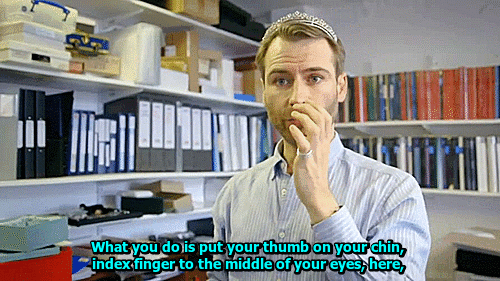
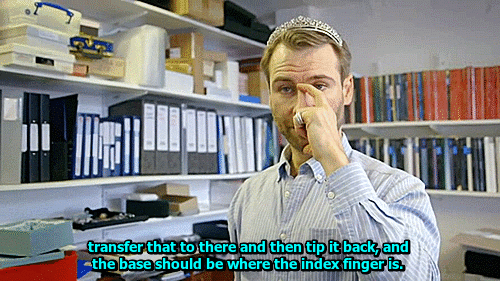
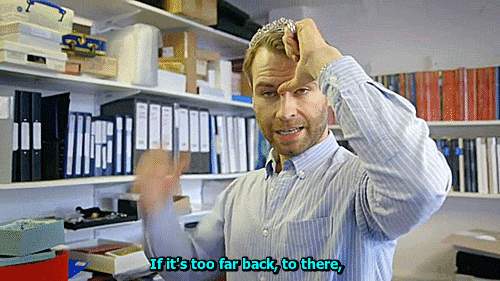
How to Impress Anyone in 30 Seconds or Less

Few things in life will help you more than knowing how to make an immediate great impression. Make note of these impressive habits. Some experts estimate that 85 percent of your financial success comes not from your skills or knowledge but from your ability to connect with other people and engender their trust and respect.
Within seconds, everyone you meet forms an impression that largely determines whether they'll like, trust, and respect you.
Whether you're job-hunting or fundraising or leading an organization, making a good impression is absolutely critical. (No pressure, right?)
So whether you are looking to raise money for your company, or you are managing your team or leading your business, connecting to people and making a great impression is very important.
Here are some tips to help you win hearts and minds in 30 seconds:
Neutralize the fight-or-flight response. The first few seconds of a first encounter are driven by instinctive reactions. Each person makes unconscious immediate appraisals that center around how safe they feel. Be mindful of your immediate signals, and make sure they could never be perceived as threatening.
Respect boundaries. Be mindful of personal space and respect the boundaries of others. If in doubt, follow the other person's cues: if they lean in, you lean in; if they stand back, you do the same. Remember that concepts of appropriate personal space vary by culture.
Feed expectations. In business, first impressions are frequently colored by expectations. We expect people to live up to the image we have created in our minds from their reputation, phone calls, emails, or texts. We expect consistency with that general image -- and without it, we feel some degree of disappointment and confusion. It's not the time to surprise others with a new side of your personality.
Be mindful of body language. It accounts for more than half of what others respond to initially -- so it literally does speak louder than words. Hold yourself in a way that signals attention and an open heart, and keep a facial expression that combines authority with approachability and eye contact.
Stay positive. The language of the brain is pictures, sounds, feelings, and to a lesser extent, smells and tastes. It's much more difficult to translate negatives into brain-friendly imagery than positives. Work to develop a positive explanatory style.
Keep control of your attitude. The general energy you give off is one of the first unconscious things people respond to. If you're frazzled, project calm. If you're distracted and unenthusiastic, project positivity. (You'll not only make a better impression, but you can influence your own mood.)
Manage your moods. People are drawn to warmth, enthusiasm, and confidence more than anger, arrogance, and impatience. Whatever is going on around you, manage your responses to get the best response from others.
Synchronize. Make sure your words, your tone of voice, and your body language are all saying the same thing. Mixed messages put off others, but consistency gives you clarity and credibility.
Use sensory language. Activate people's senses, and mix up your imagery to make sure you hit their strength. Whenever possible, use descriptions of visual images, sounds, textures, motion, and feelings to add meaning to what you're saying.
Be curious, open-minded, and interested. If you can get the other person talking and keep them talking, odds are they'll be drawn to you. Be interested and open-minded; ask questions that spark their imagination and ignite conversation.
Dress for success. Find a personal style that represents who you are and the message you want to send about yourself. Look at your dress and appearance as packaging a product.
Have a personal statement. Have a personal statement prepared and memorized so you can tell others concisely and eloquently what you do, what it means to you, and why it makes a difference. Think of it not as a sales pitch but an engaging and artfully crafted mini-presentation.
Work through these points and you should have a great first impression all lined up.
One final tip as you get out there: Treat every connection you make as if it's the most important thing you've ever done. Because, frankly, you never know when it actually will be.


So you’ve got this bitch-ass fitted sheet that you would normally pile into a ball and shove into a closet so you won’t have to deal with it, yeah? Well. Quit acting like a piece of linen is better than you are. You can make a fitted sheet bend to your will. And here’s how…

First, put your sheet on the floor. Stand above it for a few seconds so it knows who’s boss.

Then, put your hand in the lower left corner so that it’s inside out. Do the same to the lower right corner.

Now, your lower left and right corners of the fitted sheet should be inside out. (Shoutout to Amy Poehler, love your work).

Then, take the lower left corner (that’s still inside out) and tuck it into the upper left corner. It should look like the picture above once you’re done. Then, do the same with your right corners.

It should look something like that. Right now, she’s your friend at the end of a good night out. Doesn’t look really bad, but you know she deserves better.

Pull at the corners until you get something like this shape, as it makes it easier to fold. You’ve given your friend some plain white bread and a glass of water. She’s looking much more presentable now.

Now, pull in at the elastic until you make a rectangle. You’ll want to tuck and smooth the excess fabric away from the elastic seams and towards the closed edge of the fitted sheet.

Once you’ve got a (semi) neat rectangle, fold the the top of the sheet down about a third of the way through. I like to fold the upper part of the sheet down first, because it’s not as straight of an edge as the bottom. You can find your own meaning within that description.

Now, fold the lower portion of the sheet on top of the part you’ve already folded down.

Fold the left side of the sheet into the middle, and then fold the right side of the sheet on top of what you just folded.

Congratulations. You just made a fitted sheet your bitch.
